8 android-приложений, превращающих смартфон в пульт для техники
Содержание:
Пожалуйста, помогите c переводом:
Policy – Forestry Commission England continues to
take the lead on grey squirrel policy on behalf of Defra.
Английский-Русский
Mendeleev was foreshadowed in his great generalization by De Chancourtois’s helix of elements of 1863, J.A.R. New-lands’s *law of octaves* (1864-5)-which uncovered periodicity in the 8th elements of his chemical groupings — and W. Odling’s work, which suggested that recurrent chemical properties in elements arranged according to atomic weight could not be accidental.
Английский-Русский
In the UK and the USA, law degree programmes usually take three years to complete. In the UK, these programmes typically include core subjects such as criminal law, contract law, tort law, land law, equity and trusts, administrative law and constitutional law. In addition, students ar
Английский-Русский
It slides comfortably into the ‘affordable’ bracket though, considering its supersized display, and when it lands on contract (which should be soon) it won’t carry hefty monthly fees.
Английский-Русский
License
The MIT License (MIT)
Copyright 2016 Joseph Bethge
Permission is hereby granted, free of charge, to any person
obtaining a copy of this software and associated documentation
files (the “Software”), to deal in the Software without
restriction, including without limitation the rights to use,
copy, modify, merge, publish, distribute, sublicense, and/or sell
copies of the Software, and to permit persons to whom the
Software is furnished to do so, subject to the following
conditions:
The above copyright notice and this permission notice shall be
included in all copies or substantial portions of the Software.
The software is provided “as is”, without warranty of any kind, express or implied, including but not limited to the warranties of merchantability, fitness for a particular purpose and noninfringement. In no event shall the authors or copyright holders be liable for any claim, damages or other liability, whether in an action of contract, tort or otherwise, arising from, out of or in connection with the software or the use or other dealings in the software.
Chrome Remote Desktop
What We Like
-
Lets you remote into the computer even when the user isn’t logged in
-
Installs quickly
-
Has multi-monitor support
-
Includes a file transfer tool
-
Lets you remote into the computer via an app
-
Works on Windows, macOS, and Linux
What We Don’t Like
-
Chrome is the recommended browser to use (which the host might not have installed)
-
Can’t chat with the remote user
-
Remote printing isn’t allowed
Chrome Remote Desktop is an extension for the Google Chrome web browser that lets you set up a computer for remote access from any other computer running Google Chrome.
Host Side
The way this works is that you install the extension in Google Chrome and then give authorization for remote access to that PC via a personal PIN you create yourself.
This requires you to log on to your Google account, like your Gmail or YouTube login information.
Client Side
To connect to the host browser, sign on to Chrome Remote Desktop through another web browser (it has to be Chrome) using the same Google credentials or using a temporary access code generated by the host computer.
Because you’re logged in, you can easily see the other PC name, from where you can simply choose it and begin the remote session.
There isn’t a chat function supported in Chrome Remote Desktop like you see with similar programs, but it’s very easy to configure and lets you connect to your computer (or anyone’s) from anywhere using just your web browser.
What’s more is that you can remote into the computer when the user doesn’t have Chrome open, or even when they’re completely logged out of their user account.
Since Chrome Remote Desktop runs entirely within the Google Chrome browser, it can work with any operating system that uses Chrome, including Windows, Mac, Linux, and Chromebooks.
Remote Utilities
What We Like
-
Includes lots of remote access tools
-
Great for both spontaneous and unattended remote access
-
Supports portable mode
-
Doesn’t require router port changes
-
Free for both personal and business use
-
Lets you connect to up to 10 computers for free
What We Don’t Like
-
It can get confusing setting up the program for first use
-
Linux and macOS versions are in beta.
Remote Utilities is a free remote access program with some really great features. It works by pairing two remote computers together with an Internet ID. Control a total of 10 computers with Remote Utilities.
Host Side
Install a portion of Remote Utilities called Host on a Windows computer to gain permanent access to it. Or o just run Agent, which provides spontaneous support without installing anything—it can even be launched from a flash drive.
The host computer obtains an Internet ID that a client uses to make a connection.
Client Side
The Viewer program connects to the host or agent software.
Download Viewer on its own or in the Viewer + Host combo file. Download a portable version of the Viewer if you’d rather not install anything.
Connecting the Viewer to the Host or Agent doesn’t require any router changes like port forwarding, making setup very easy. The client just needs to enter the Internet ID number and password.
There are also client applications that can be downloaded for free for iOS and Android users.
Different modules can be used from the viewer so you can actually access a computer remotely without even viewing the screen, though screen-viewing is definitely Remote Utilities’ main feature.
Here are some of the modules Remote Utilities allows: A remote task manager, file transfer, power control for remote rebooting or WOL, remote terminal (access to Command Prompt), remote file launcher, system information manager, text chat, remote registry access, and remote webcam viewing.
In addition to these features, Remote Utilities also supports remote printing and viewing multiple monitors.
Unfortunately, configuring Remote Utilities can be confusing on the host computer since there are lots of different options.
Remote Utilities can be installed on Windows 10, 8, 7, Vista, and XP, as well as Windows Server 2016, 2012, 2008, and 2003. There’s also a version for Linux and macOS, but both are in beta and might not work as well as the Windows edition.
References
- D. P. Sen Gupta, Meher H. Engineer, Virginia Anne Shepherd., Remembering Sir J.C. Bose, Indian Institute of Science, Bangalore; World Scientific, 2009 ISBN ,page 106
- Jonnes, Jill. Empires of Light ISBN 0-375-75884-4. Page 355, referencing O’Neill, John J., Prodigal Genius: The Life of Nikola Tesla (New York: David McKay, 1944), p. 167.
- ^
- ^
- «Philips tops in converters». The Toronto Star: p. F03. November 29, 1980.
- ICT Roger Crawford – Heinemann IGCSE – Chapter 1 page 16
- Enders, David (October 2008). «Mahdi Army Bides its Time». The Progressive.
- Edwyn Gray, Nineteenth-century torpedoes and their inventors, page 18
- Gray, Edwyn (2004). Nineteenth-Century Torpedoes and Their Inventors. Naval Institute Press. ISBN 978-1-59114-341-3.
- Lightoller, Charles Herbert (1935). Titanic and Other Ships. I. Nicholson and Watson.
Call methods from other modules
Examples
Example for a REST API GET request to trigger a RaspberryPi restart:
Example to trigger a RaspberryPi restart in your module:
See some specific examples for controlling your mirror from other modules and add your own examples in the Wiki page here
List of actions
System Control:
| Action | Description |
|---|---|
| SHUTDOWN | Shutdown your RaspberryPi |
| REBOOT | Restart your RaspberryPi |
| MONITORON | Switch your display on. Also sends a notification. |
| MONITOROFF | Switch your display off. Also sends a notification. |
| MONITORTOGGLE | Toggle the display on or off (with respective notification. |
| MONITORSTATUS | Report back the monitor status (on or off) |
MagicMirror Control:
| Action | Description |
|---|---|
| RESTART | Restart your MagicMirror |
| REFRESH | Refresh mirror page |
| UPDATE | Update MagicMirror and any of it’s modules |
| SAVE | Save the current configuration (show and hide status of modules, and brightness), will be applied after the mirror starts |
| BRIGHTNESS | Change mirror brightness, with the new value specified by . equals the default, possible range is between and . |
MagicMirror Electron Browser Window Control:
| Action | Description |
|---|---|
| MINIMIZE | Minimize the browser window. |
| TOGGLEFULLSCREEN | Toggle fullscreen mode on and off. |
| DEVTOOLS | Open the DevTools console window. |
Module Control:
| Action | Description |
|---|---|
| HIDE | Hide a module, with the name (or identifier—see action) specified by in the payload. You can also send to hide all modules. |
| SHOW | Show a module (see above for how to specify which one). |
| TOGGLE | Toggle a module’s visiblity (see above for how to specify which one). |
| FORCE | Force a module to show (see above for how to specify which one). |
| MODULE_DATA | Returns a JSON format of the data displayed in the UI, including all valid identifiers for the and action. |
Alerts and Notifications:
| Action | Description |
|---|---|
| SHOW_ALERT | Show Default Alert/Notification |
| HIDE_ALERT | Hide Default Alert/Notification |
| USER_PRESENCE | Will send a notification «USER_PRESENCE» = true or false (according to «value» to all other modules. See examples above |
| NOTIFICATION | To send a notification to all modules, see the example in the API README |
| DELAYED | Send any of the above nested inside a «DELAYED» call to delay the action. Default is 10s. See Delayed Actions below. |
Format of module data response
The response will be in the JSON format, here is an example:
{
"moduleData":,
"brightness":40,
"settingsVersion":1
}
Delayed Actions
You can delay an action by sending the notification nested inside of a notification. Below is an example of turning off the monitor in 60s.
this.sendSocketNotification("REMOTE_ACTION",
    {
        action: "DELAYED",
        did: "SOME_UNIQUE_ID", // Optional; Some string, in case you want to cancel later.
        timeout: 60,  // Optional; Default 10s
        abort: false, // Optional; send true to cancel an existing timer
        query: {
            action: "MONITOROFF"
        }
    });
Using Custom Commands
Depending on your installation, some commands used by this module are not appropriate and can be overwritten by something that will work for you. To overwrite the commands, add a object to your config section. The following commands are supported:
    customCommand: {
        monitorOnCommand: 'shell command to turn on your monitor',
        monitorOffCommand: 'shell command to turn off your monitor',
        monitorStatusCommand: 'shell command to return status of monitor, must return either "HDMI" or "true" if screen is on; or "TV is Off" or "false" if it is off to be recognized'
    }
Custom Menu Items
You can create your own customized menu items by providing creating a JSON file for the menu and providing a directive in your config. The file may be called whatever you want, but the name must be provided in the section, and it must be stored in the Mirror’s directory (same place as your file).
An example menu is provided in this module’s folder, titled . You can copy this to the folder and modify as you need.
Key Components:
| Name | Description |
|---|---|
| The HTML id prefix to use for the menu item. | |
| The item type, either or . is used to indicate the item is a sub-menu and has an array. is used for single menu items and will send a socket «REMOTE_ACTION» notification back to the server. This requires and parameters before it can do anything. | |
| The text to display. You can use the translate string , but remember to also update the appropriate file in . | |
| An array of sub-menu items to use with . Should be the same format as the top level menu (i.e. the menu structure is recursive). | |
| The notification action name, usually . Required for items to be able to do anything. | |
| The action payload to send. Usually for , this is of the form |
LiteManager
What We Like
-
Stores remote access information for up to 30 computers
-
Several ways to connect to a remote computer
-
You can open files remote without controlling the screen
-
Lets you transfer files without any notifications or alerts
-
Supports text chat
-
Includes lots of useful tools
-
Supports spontaneous and portable remote access
-
Runs on Windows and macOS
What We Don’t Like
-
The program doesn’t update very often
-
The multitude of options could be overwhelming and confusing if you just want a simple remote access tool
LiteManager is another remote access program, and it’s strikingly similar to Remote Utilities, which we explain above.
However, unlike Remote Utilities, which can control a total of only 10 PCs, LiteManager supports up to 30 slots for storing and connecting to remote computers, and also has lots of useful features.
Host Side
The computer that needs to be accessed should install the LiteManager Pro – Server.msi program (it’s free), which is contained in the downloaded ZIP file.
There are numerous ways to ensure a connection can be made to the host computer. It can be done through the IP address, computer name, or an ID.
The easiest way to set this up is to right-click the server program in the notification area of the taskbar, choose Connect by ID, erase the contents that are already there, and click Connected to generate a brand new ID.
Client Side
The other program, called Viewer, is installed for the client to connect to the host. Once the host computer has produced an ID, the client should enter it from the Connect by ID option in the Connection menu to establish a remote connection to the other computer.
Once connected, the client can do all sorts of things, much like with Remote Utilities, such as work with multiple monitors, transfer files silently, take full control or read-only access of the other PC, run a remote task manager, launch files and programs remotely, capture sound, edit the registry, create a demonstration, lock the other person’s screen and keyboard, and text chat.
There’s also a QuickSupport option, which is a portable server and viewer program that makes connecting much quicker than the above method.
I tested LiteManager in Windows 10, but it should also work just fine in Windows 8, 7, Vista, and XP. This program is available for macOS and Linux, too.
Build Instructions (Windows 10)
The following steps will configure your Windows 10 machine for building the Remotely server and clients.
- Install Visual Studio 2019.
- You only need the below Individual Components:
- .NET Core SDK (latest version).
- MSBuild (which auto-selects Roslyn compilers).
- NuGet targets and build tasks.
- .NET Framework 4.6.2 SDK.
- .NET Framework 4.6.2 targeting pack.
- You only need the below Individual Components:
- Install the latest .NET Core SDK.
- Clone the git repository and open the solution in Visual Studio.
- In development environment, the server will assign all connecting agents to the first organization.
- The above two allow you to debug the agent and server together, and see your device in the list.
Iperius Remote
What We Like
-
Very easy to use; no installation necessary.
-
No user account required.
-
Includes a chat window.
-
Supports file transfers.
What We Don’t Like
Some features are clickable but then you’re told they’re not usable in the free version.
Iperius Remote is one of the easiest to use remote desktop programs with some awesome features like a robust file transfer tool and chat application. It also lets you connect to a computer remotely with their mobile app.
Host Side
Open the program and select Allow connections to see your password. Share that and the ID next to it with the client so that they can connect to the computer.
Client Side
Enter the host computer’s ID into the second text box, press Connect, and then enter the password when you see the password prompt.
This free remote access program is perfect for on-demand access. You and the other person can download and start using Iperius Remote in just a minute or two.
The program interface is extremely simple and easy to understand. During a remote connection, you can send the Ctrl+Alt+Del shortcut, choose which display to view, switch to full screen mode, and open the file transfer or chat utility.
If you want more control you can open the settings to enable continuous access, a custom password, a proxy, etc.
Supported operating systems include 32-bit and 64-bit versions of Windows 10, 8, and 7, as well as Windows Server 2019, 2016, 2012, and 2008.
Getscreen.me
What We Like
-
Really easy installation; get started in just a few minutes.
-
Lots of features.
-
Control the computer from a web browser.
-
Great for short, one-off remote sessions.
What We Don’t Like
-
Free sessions are limited to 15 minutes.
-
Limits max linked computers to two.
-
There isn’t a mobile app (but it does work through a mobile browser).
For a simple installation with some great features, you might consider the free remote access service Getscreen.me. There’s file sharing, a built-in chat window, buttons for common keyboard shortcuts, full-screen mode, and clipboard sharing.
Host Side
The computer that will be connected to needs to download and install the software. The program lets you log in to your account so that it will automatically become available from the client side.
Another way to use Getscreen.me is to download the software and use the public link in the Connection tab. Share that with anyone and they will have access to your computer without needing a user account or password.
Client Side
There are a couple ways to access the remote computer. If you logged in to your account, visit the link below to log in from a web browser and access the other computer.
Another way is if the host didn’t log in to the account. The host can provide a URL that you can open from your computer to automatically have access to the remote PC without even logging in to your account. This can be handy for spontaneous remote access.
Free users are faced with several limitations that can be lifted only if you pay. Simultaneous connections are limited to one, session duration can’t exceed 15 minutes, only two desktops can be linked to your account at once, and file transfers are limited to 50 MB.
It works on Windows, macOS, and Linux. You can control the computer from any device with a web browser.
AeroAdmin
What We Like
-
Can be installed as a portable application
-
Free for commercial and private use
-
Works right away; no router changes are necessary
-
Can remotely log off and reboot the computer
-
Encrypted connections
-
Ideal for spontaneous and unattended access
What We Don’t Like
-
Doesn’t support chat
-
Connection times are limited in the free edition
-
Can’t print remotely
-
No file transfer support in free version
AeroAdmin is probably the easiest program to use for free remote access. There are hardly any settings, and everything is quick and to the point, which is perfect for spontaneous support.
Host Side
Just open the portable program and share your IP address or the given ID with someone else. This is how the client computer will know how to connect to the host.
Client Side
The client PC just needs to run the same AeroAdmin program and enter the ID or IP address into their program. You can choose View only or Remote Control before you connect, and then just select Connect to request remote control.
When the host computer confirms the connection, you can start controlling the computer and share clipboard text.
It’s great that AeroAdmin is absolutely free for both personal and commercial use, but it’s too bad there isn’t a chat option included, and really too bad that you can’t transfer files.
Another note that needs to be made is that while AeroAdmin is 100% free, it does limit how many hours you can use it per month.
AeroAdmin can be installed on 32-bit and 64-bit versions of Windows 10, 8, 7, and XP.
ShowMyPC
What We Like
-
Simple, to-the-point design
-
Lets others connect to your computer through a special URL
-
The program is portable and perfect for spontaneous remote access
What We Don’t Like
-
Keyboard shortcuts are limited
-
Shows premium options that you can’t use in the free edition
ShowMyPC is a portable and free remote access program that’s nearly identical to UltraVNC (No. 2 in this list) but uses a password to make a connection instead of an IP address.
Host Side
Run the ShowMyPC software on any computer and then choose Show My PC to get a unique ID number called a Share Password.
This ID is the number you must share with others so they can connect to the host.
Client Side
Open the same ShowMyPC program on another computer and enter the ID from the host program to make a connection. The client can instead enter the number on the ShowMyPC website (in the «View PC» box) and run a Java version of the program within their browser.
There are additional options here that aren’t available in UltraVNC, like webcam sharing over a web browser and scheduled meetings that allow someone to connect to your PC via a personal web link that launches a Java version of ShowMyPC.
ShowMyPC clients can only send a limited number of keyboard shortcuts to the host computer.
Choose ShowMyPC Free on the download page to get the free version. It works on all versions of Windows.
DesktopNow
What We Like
-
You can access remote computers from any web browser
-
Lets you avoid setting up router port forwards, but that is an option
-
Includes a remote file browser for file transfers
What We Don’t Like
-
Hasn’t been updated in a long time
-
Unattended access is hard to achieve
DesktopNow is a free remote access program from NCH Software. After optionally forwarding the proper port number in your router, and signing up for a free account, you can access your PC from anywhere through a web browser.
Host Side
The computer that will be accessed remotely needs to have the DesktopNow software installed.
The host computer can either configure its router to forward the proper port number to itself or choose cloud access during the install to make a direct connection to the client, bypassing the need for complicated forwarding.
It’s probably a better idea for most people to use the direct, cloud access method to avoid issues with port forwarding.
Client Side
The client just needs to access the host through a web browser. If the router was configured to forward the port number, the client would use the host PCs IP address to connect. If cloud access was chosen, a specific link would have been given to the host that you’d use for the connection.
DesktopNow has a nice file sharing feature that lets you download your shared files remotely in an easy to use file browser.
There isn’t a dedicated application to connect to DesktopNow from a mobile device, so trying to view and control a computer from a phone or tablet can be difficult. However, the website is optimized for mobile phones, so viewing your shared files is easy.
64-bit versions of Windows are supported.
Remote Control Systems
As an integral part of BESI´s flow management systems, Control Systems for Remote Controlled Valves (RCV), Tank Level Gauging (TLV) and Anti Heeling System (AHS) are offered.
Control Stations
BESI designs and produces centralized and decentralized control stations for hydraulic, pneumatic, electric and electro-hydraulic systems. These control stations are designed according to the rules and requirements of all major classification societies and contain all necessary components, such as power packs, for safe operation of the system. All digital and analogue incoming and outgoing signals from the field components — like limit switches of the valves, tank level sensors, floating switches, or even local operator panels — are transmitted to I/O units, mounted in the centralized or decentrelized control cabinet(s). All I/O units are controller-based and have an Ethernet interface which provides the maximum number of communication channels and protocols. This keeps the system flexible in all the channels while opening the gate for decentralized designs.
Operator Stations

Specially designed computer-based operator stations operate and monitor the RCV, TLG and AHS systems. For the Engine Control Room (ECR), a class-approved fanless operating Touch Panel IPC (with no keyboard or mouse unit necessary) is available. This panel features flush-mounting on the control cabinet door. Other Operator Stations — for example in the Decks Office — operate with a speciallydesigned desktop computer complete with TFT colour monitor, mouse and keyboard. Each operator station is able to operate in a «stand-alone» mode. A software interlock with password levels is integrated to deny unauthorized access.
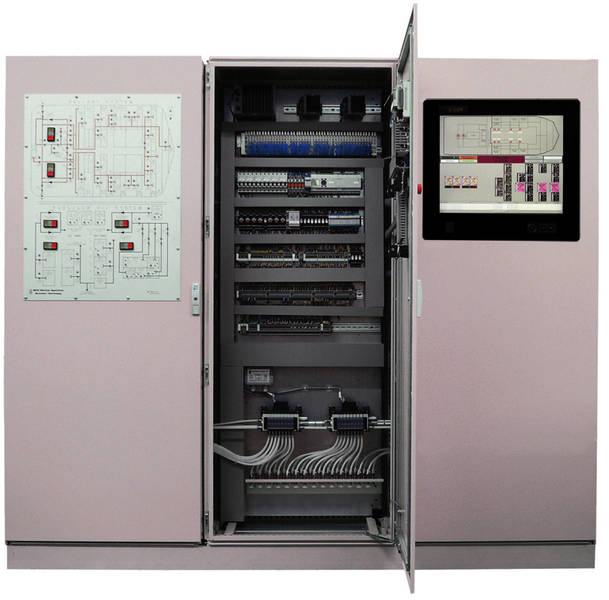
The operator / user panels (HMI) are based on a clearly arranged graphical overview. All functions are simple and menu-assisted, which provide maximum convenience to secure and save operations (see below some samples of screenshots).
Open System
Designed as an open system — products from other manufacturers such as loading computers — can easily be connected to the BESI system via Ethernet switch.
If a communication partner cannot provide an Ethernet connection, or if the port is already in use, a serial RS485 interface is available.
RC-Valves open/close operation
- Ballast pumps on/off operations
- Anti Heeling System
- Remote control Start / Stop Ballast Pump 1&2
- Remote control Start / Stop HFO Pump 1&2
Indications
- RC-Valves position open/close
- Ballast Pumps running
- HFO Pumps running
- Tank level indications Ballast Water, HFO, MDO, F-Water
- Draft, from sensors
AnyDesk
What We Like
-
Has you create an easy-to-remember alias for remote connections
-
Supports both audio and file transfer
-
Lets you record the remote session
-
Connections can be configured to favor quality or speed
-
Updates to new software versions automatically
-
Works on Linux, Windows, and macOS
-
There’s a mobile app available
What We Don’t Like
-
Could be confusing to understand at first
-
Might limit connection time or address book entries because there are also paid versions of the program
AnyDesk is a remote desktop program that you can run portably or install like a regular program.
Host Side
Launch AnyDesk on the PC you want to connect to and record the 9-digit number, or custom alias if one is set up.
When the client connects, the host will be asked to allow or disallow the connection and can also control permissions, like to allow sound, clipboard use, and the ability to block the host’s keyboard/mouse control.
Client Side
On another computer, run AnyDesk and then enter the host’s Remote Desk ID or alias in the Remote Desk section of the program. Press Connect, and wait for the host to press Accept.
If unattended access is set up, the client doesn’t need to wait for the host to accept the connection.
AnyDesk auto-updates and can enter full-screen mode, balance between quality and speed of the connection, transfer files and sound, sync the clipboard, record the remote session, run keyboard shortcuts, take screenshots of the remote computer, and restart the host computer.
AnyDesk works with Windows (10 through XP), macOS, and Linux.
UltraVNC
What We Like
-
Supports file transfers
-
Custom keyboard shortcuts can be set up
-
You can send chat messages to the remote computer
-
Lets you connect to a remote computer from a browser, computer program, and mobile app
What We Don’t Like
-
You have to change your router settings to make the program work
-
Doesn’t work well for on-demand, spontaneous remote access
-
Can’t print remotely
-
Unable to turn the computer on remotely
-
Confusing download page
Another remote access program is UltraVNC. UltraVNC works a bit like Remote Utilities, where a server and viewer is installed on two PCs, and the viewer is used to control the server.
Host Side
When you install UltraVNC, you’re asked if you wish to install the Server, Viewer, or both. Install the Server on the PC you wish to connect to.
You can install the UltraVNC Server as a system service so it’s always running. This is the ideal option so you can always make a connection to it with the client software.
Client Side
To make a connection with the UltraVNC Server, you must install the Viewer portion during setup.
After configuring port forwarding in your router, you’ll be able to access the UltraVNC server from anywhere with an internet connection—either via a mobile device that supports VNC connections, a PC with the Viewer installed, or an internet browser. All you need is the Server’s IP address to make the connection.
UltraVNC supports file transfers, text chat, clipboard sharing, and can even boot and connect to the server in Safe Mode.
The download page is a little confusing—first select the most recent UltraVNC version, and then choose the 32-bit or 64-bit setup file that will work with your edition of Windows.
Windows 10, 8, 7, Vista, XP, and Windows Server 2012, 2008, and 2003 users can install and use UltraVNC.


